> ## Documentation Index
> Fetch the complete documentation index at: https://help.hellofig.io/llms.txt
> Use this file to discover all available pages before exploring further.
# Accept payments
> Connect Stripe so your Fig website can take payments.
Fig can help your website **take payments** by connecting your own
[Stripe](https://stripe.com) account. Sell a product, take a deposit, or collect a
booking fee — the money goes straight to your Stripe account.
 ## How it works
You connect your Stripe account once, and from then on Fig can set up the payment
pieces your site needs:
* **Payment links** — a checkout for a product, service, or booking
* **Behind-the-scenes wiring** — Fig registers what's needed so payments and
confirmations flow correctly
Because it's *your* Stripe account, you keep full control of your money, payouts,
and records — right where you'd expect them, in Stripe.
## Setting it up
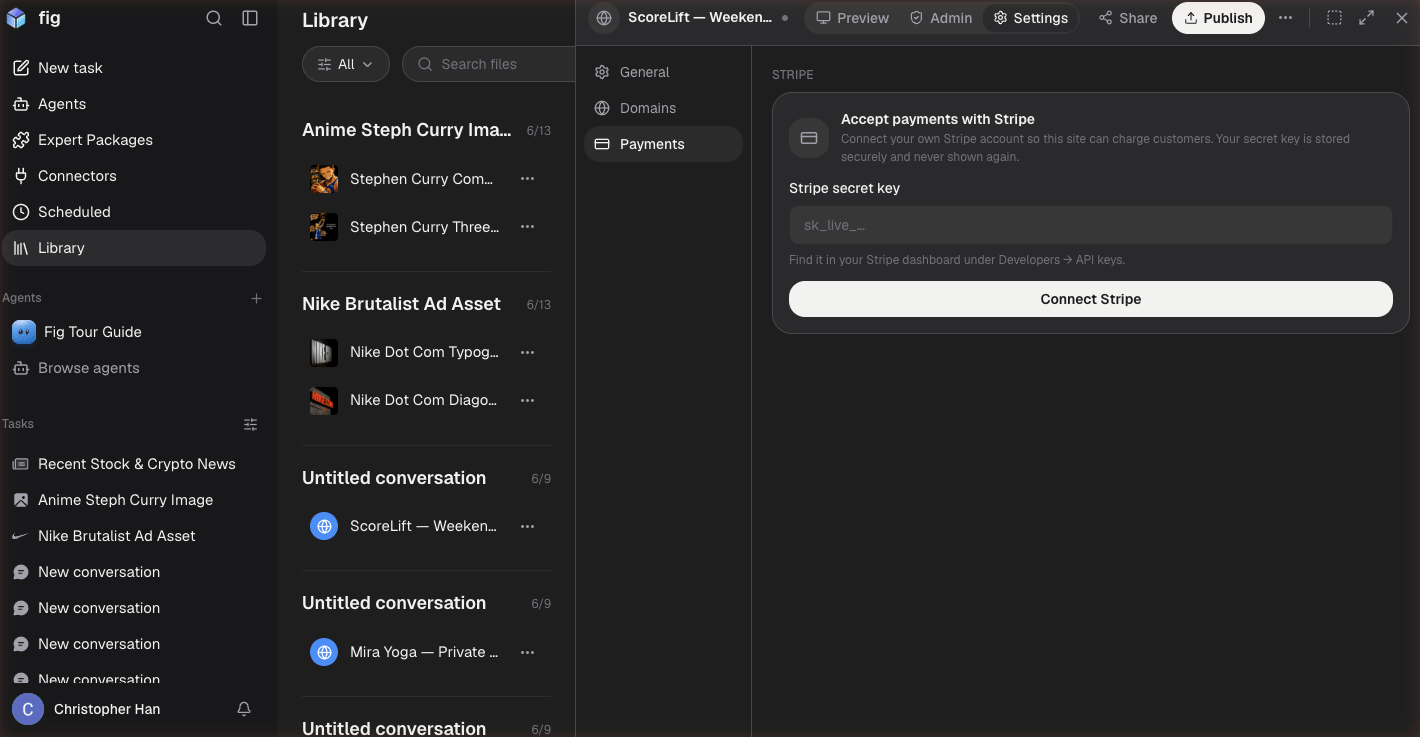
In your website's settings, choose to connect Stripe and sign in to your Stripe
account.
Describe what you want to charge for — "add a $30 booking deposit" or "sell my
e-book for $15" — and Fig sets up the checkout.
[Publish your site](/websites/publishing) and start taking payments.
Don't have a Stripe account yet? You can create one for free at
[stripe.com](https://stripe.com), then connect it to Fig.
Pair payments with a [database-backed page](/websites/databases) and an
[automation](/features/scheduled-tasks) — for example, email a receipt and log
the order whenever someone buys.
## How it works
You connect your Stripe account once, and from then on Fig can set up the payment
pieces your site needs:
* **Payment links** — a checkout for a product, service, or booking
* **Behind-the-scenes wiring** — Fig registers what's needed so payments and
confirmations flow correctly
Because it's *your* Stripe account, you keep full control of your money, payouts,
and records — right where you'd expect them, in Stripe.
## Setting it up
In your website's settings, choose to connect Stripe and sign in to your Stripe
account.
Describe what you want to charge for — "add a $30 booking deposit" or "sell my
e-book for $15" — and Fig sets up the checkout.
[Publish your site](/websites/publishing) and start taking payments.
Don't have a Stripe account yet? You can create one for free at
[stripe.com](https://stripe.com), then connect it to Fig.
Pair payments with a [database-backed page](/websites/databases) and an
[automation](/features/scheduled-tasks) — for example, email a receipt and log
the order whenever someone buys.